


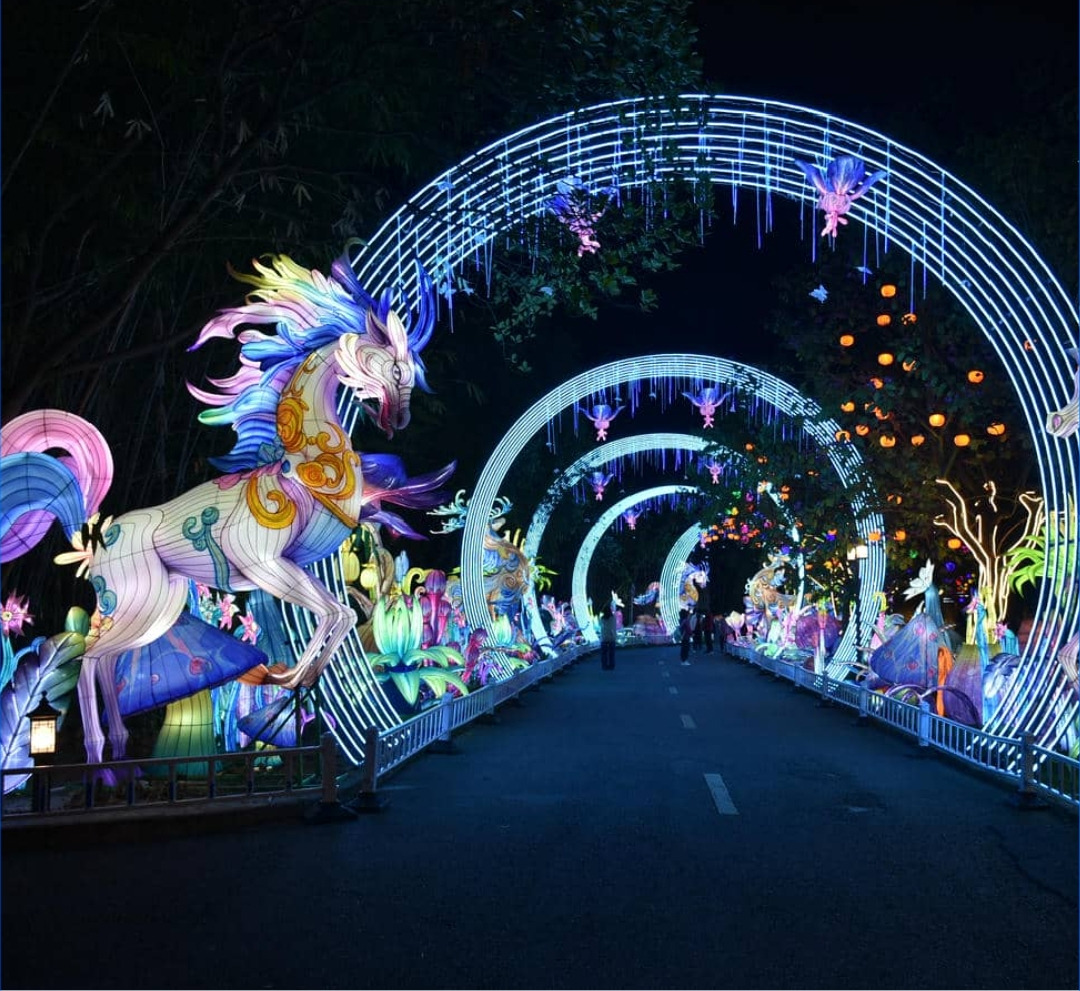
Parks, botanical gardens, zoos, estates and scenic attractions often possess an underused asset: an established network of walking paths that becomes quiet after daytime visitors leave.
With the right planning, these paths can be transformed into a light trail—a structured nighttime journey combining illuminated landscapes, themed installations, walk-through features, photo opportunities and visitor services.
A successful light trail is not created by placing lights at regular intervals along a path. It must function as a complete visitor experience. The route needs a clear beginning, visual progression, memorable focal points, safe circulation and a strong reason for people to purchase tickets, stay longer and recommend the event.
For venues looking to extend operating hours or create a seasonal attraction, the existing landscape can provide the foundation. The challenge is learning how to use it effectively.
Start With the Venue, Not the Display Catalogue
The first stage is to understand what the venue can realistically support.
Operators should review the site during both daylight and darkness. A path that appears simple during normal opening hours may present different challenges at night, including uneven surfaces, limited electrical access, dark intersections, steep slopes or difficult emergency access.
The initial assessment should consider:
- Total usable route length
- Entrance and exit locations
- Path width and surface condition
- Accessibility for wheelchairs and strollers
- Existing trees, buildings, lakes and landscape features
- Electrical supply and distribution points
- Areas exposed to wind, flooding or poor drainage
- Emergency and maintenance access
- Nearby residents or sensitive environments
- Available parking and public transport
- Locations for toilets, food, retail and rest areas
The objective is not necessarily to use every available path. A shorter, well-paced route can deliver a better experience than a long route containing empty or repetitive sections.
Venues beginning this assessment can consult HOYECHI’s commercial light trail planning guide for a practical overview of route structure, display selection, production and project delivery.
Define What the Light Trail Must Achieve
Before designing the visual experience, the operator should define the commercial and operational purpose of the event.
Different venues may have very different objectives. A botanical garden may want to increase winter attendance. A zoo may want to attract families after its normal daytime operation. A resort may use an illuminated trail to create an evening activity for guests. A municipal park may prioritize tourism, community participation and sponsorship exposure.
Possible objectives include:
- Generating ticket revenue
- Extending evening opening hours
- Increasing seasonal attendance
- Supporting food, beverage and retail sales
- Creating a repeatable annual event
- Attracting new visitor groups
- Increasing destination awareness
- Encouraging overnight stays
- Providing sponsor visibility
- Activating an underused part of the venue
These objectives influence the route length, theme, ticket price, operating dates, display mix and marketing strategy. Without a clear purpose, the project can easily become an expensive decorative installation rather than a sustainable visitor attraction.
Build the Route as a Sequence of Experiences
Visitors should feel that they are progressing through a journey rather than walking past an unrelated collection of objects.
A strong outdoor light trail commonly includes six stages.
1. Arrival and Orientation
The experience begins before visitors enter the illuminated route. Parking, pedestrian access, ticket scanning, waiting areas, toilets and accessibility information should be clearly organized.
Lighting in this area needs to support safety and orientation without revealing the entire attraction too early.
2. Entrance Landmark
A large illuminated gateway, custom arch, tunnel or signature sculpture establishes the event identity.
This installation frequently becomes the main image used in advertising, media coverage and visitor photographs. It should therefore be visible, recognizable and large enough to communicate that guests are entering a special experience.
3. Themed Discovery Zones
The main route can be divided into visual chapters. Themes may include forests, flowers, wildlife, oceans, dinosaurs, fantasy, local culture, seasonal celebrations or stories connected to the venue.
Each zone should have its own character while still feeling like part of one event.
Transitions between zones are important. Darker landscape sections, smaller lighting details or walk-through arches can give visitors a visual pause before the next major scene.
4. Signature Climax
The largest or most immersive installation should normally appear near the middle or later part of the journey rather than immediately after the entrance.
A giant sculpture, illuminated lake, overhead light canopy, interactive installation or large themed scene can provide the moment visitors remember most clearly.
5. Rest and Commercial Area
Food, drinks, retail and seating should be positioned where visitors naturally slow down. These facilities should be integrated into the journey without blocking the path or weakening the atmosphere with excessive service lighting.
6. Finale and Exit
The final section should provide a satisfying conclusion. It may include a farewell display, final photo opportunity, branded installation, gift shop or view across the illuminated landscape.
The exit should remain separate from arriving visitors whenever the venue layout allows it.
Use the Existing Landscape as Part of the Attraction
One of the greatest advantages of a light trail is that the venue itself can become part of the visual experience.
Trees can frame illuminated sculptures or support overhead lighting. Lakes can reflect large installations. Bridges can become transitions between themed zones. Open lawns can accommodate landmark displays, while woodland paths can create mystery and anticipation.
This approach reduces the need to fill every area with physical products. It also gives the event a stronger connection to its location.
However, landscape lighting should be planned carefully. Excessively bright lighting can flatten the scene, reduce contrast and disturb surrounding areas. A more effective design uses different lighting levels, selective darkness and controlled viewing angles.
Sensitive plants, animal areas, waterways and protected habitats may also require environmental review. The visual plan should respect local restrictions on brightness, operating hours, sound and wildlife disturbance.
Plan for Visitor Flow, Not Just Route Length
A one-kilometre trail does not automatically provide greater ticket value than a shorter route. The important measurement is the quality and rhythm of the complete visit.
Operators need to estimate:
- Expected visitors per operating night
- Peak arrivals per timed-entry session
- Average walking speed
- Time spent at major installations
- Queue time at interactive displays
- Stops for photographs, food and rest
- Total intended visit duration
- Capacity of narrow paths and bridges
- Emergency evacuation requirements
Photo opportunities create some of the largest visitor pauses. A popular installation positioned on a narrow path can produce congestion even when the rest of the trail has adequate capacity.
Major photo scenes should therefore include space for waiting, viewing and passing. Interactive installations may need staff or simple directional signs to keep visitors moving.
Timed ticketing can distribute arrivals more evenly and reduce pressure on parking, entrances and the first section of the trail.
Create Moments Visitors Want to Share
Visitor photography can contribute significantly to event awareness.
The most shareable installations are not always the most expensive. They are the ones with clear shapes, recognizable themes, suitable viewing distances and enough space for people to stand within or beside the scene.
Potential photo features include:
- Walk-through light tunnels
- Giant illuminated animals
- Floral or butterfly arches
- Interactive wings and picture frames
- Custom venue symbols
- Oversized gift boxes or ornaments
- Reflections across water
- Illuminated trees and overhead canopies
- Local landmarks recreated as light sculptures
The background also matters. Service areas, visible cables, barriers and temporary storage can weaken an otherwise attractive image.
Photo locations should be evaluated from the visitor’s camera position during the design stage—not after installation is complete.
Connect the Experience to a Commercial Model
A light trail can support several sources of revenue.
Ticket sales may provide the primary income, but operators can also consider:
- Premium entry times
- Family and group packages
- Corporate or private evenings
- Food and beverage concessions
- Seasonal merchandise
- Sponsored installations
- Parking fees
- Professional photography
- Hotel and attraction packages
- Membership upgrades
- Retail partnerships
Commercial elements should feel like a natural part of the visitor experience. Placing too many sales points along the route can make the attraction feel fragmented. Conversely, a well-positioned refreshment area or seasonal market can increase visitor comfort and average spending.
The financial model should include the full project lifecycle: design, production, transport, installation, electricity, staffing, marketing, maintenance, dismantling and storage.
Prepare for Outdoor Operating Conditions
An illuminated trail may operate through cold, rain, wind or snow. Reliability and safety therefore need to be included from the beginning.
The project team should review:
- Structural anchoring
- Outdoor electrical protection
- Cable routing and trip hazards
- Wind exposure
- Water accumulation and drainage
- Daily inspection procedures
- Spare lighting and electrical components
- Pathway visibility
- Emergency lighting
- Weather-related closure policies
- Crowd and security procedures
- Maintenance access during operating hours
Large custom structures should be designed around their intended location and installation method. Factory assembly and pre-installation testing can help identify missing components, connection problems or lighting faults before equipment reaches the venue.
Local engineers, electricians, safety authorities and event operators should remain involved where required. Display production is only one part of delivering a safe public attraction.
Design for Reuse and Seasonal Renewal
The economics of a light trail improve when major installations can be reused.
Modular frames, detachable sections, replaceable lighting components and organized packaging can make equipment easier to transport, install, maintain and store.
Reuse does not mean presenting exactly the same route every year. Venues can retain signature installations while changing the order, adding a new theme, refreshing the entrance or replacing selected photo scenes.
A practical multi-season strategy might include:
- Keeping the strongest landmark installations
- Rearranging themed zones
- Updating 20–30 percent of the visible experience
- Introducing a new finale
- Changing interactive features
- Refreshing promotional photography
- Adding local or sponsor-related content
Planning for future seasons before manufacturing begins can protect the original investment and give previous visitors a reason to return.
Measure More Than Attendance
Total visitor numbers are important, but they do not provide a complete picture of performance.
Operators should also monitor:
- Ticket revenue
- Average revenue per visitor
- Sales by time slot
- Weekday and weekend occupancy
- Visitor dwell time
- Food and retail spending
- Marketing cost per booking
- Social media sharing
- Visitor satisfaction
- Technical downtime
- Weather-related cancellations
- Congestion points
- Intention to return
Operational observations are especially valuable. Staff can record which installations attract the longest queues, where visitors become confused and which areas receive less attention than expected.
These findings should be documented immediately after the event and used to improve the next season.
A Path Can Become a Destination
The strongest light trails are designed as complete visitor experiences rather than collections of illuminated products.
They combine the character of the existing landscape with route planning, themed storytelling, commercial strategy, outdoor engineering and practical event operation. Every major element—from the entrance and visitor flow to the final photograph—contributes to how people value and remember the event.
For parks, gardens, zoos, estates and tourism venues, an existing walking route can become much more than a path after dark. With careful planning, it can become a recognizable nighttime destination, a repeatable seasonal event and a new reason for visitors to return.